


Getting Started with HTML and CSS
My work involves building web pages. Not surprisingly, family and friends who are playing with the idea of creating their own web site ask me for advice for getting started with HTML and CSS. This article is for them.
This article will help you set up your computer and explain what is currently considered by many to be the best way to build a web page with style using HTML and CSS. You may need to read this page a few times for things to start making sense to you but you can do it!
Software Requirements
You need two pieces of software installed on your computer:
- a web browser
- You will be working with HTML and CSS to create web pages. Very old browsers did not understand CSS commands. Current browsers understand many CSS commands. In the future, hopefully browsers will understand all CSS commands. Internet Explorer is a browser but may be the worst for learning CSS. I recommend you get Firefox, Safari, Chrome or Opera as these four are all good browsers and free.
- a text editor
- HTML and CSS are typed in plain text files. You need a simple text editor program that can save plain text files. Notepad on Microsoft Windows or TextEdit on Apple Macintosh will work fine. (If you are using TextEdit read the Mac OS X FAQ at the bottom of this page.)
The Modern Approach
Just in case you've had some exposure to HTML before, the way HTML was used years ago is now considered a bit old-fashioned. The main problem was HTML combined two functions into one file. First, an HTML file contained the "content" which is the actual text and pictures that you want the people looking at your web page to see. Second, an HTML file contained the "presentation" which is how you would like the content too look (font size, font color, background color, ....). Having both content and presentation in one file makes it difficult to change either the content or the presentation.
The modern approach is to use an HTML file to hold only the content and it's structure (identifying which text is a heading, paragraph, list,...). A CSS file is used to hold the presentation (e.g. all headings should be red). When the two files are linked together we say the CSS file "styles" the HTML file. This separation of content and presentation has important benefits:
- It is easy for one person to work on the site content (HTML file) and another person can work on the presentation (CSS file).
- One CSS file can be used to style many HTML files. If you want to change the design of many pages you only edit one CSS file!
Another important note, in case you've had previous exposure, is that the modern approach to web design does not use tables for laying out or organizing the content of a web page. If you have never used tables to do layout then you are lucky. You can learn only the modern way using CSS which is sometimes called "tableless" or "table-free" layout.
To see the benefits of separation of content and presentation and tableless layout, visit css Zen Garden and select different designs. Just one click there convinced me the modern approach is the way to go!
Example
This basic example will show you what HTML and CSS files look like and how they are linked together. After this example is working then you can learn what each line means.
The Example Folder
For this example to work the HTML file and CSS files must be saved in the same folder on your computer.
Somewhere on your computer (maybe the desktop) create a folder
called GettingStarted.
The HTML file
Now we write the HTML file which contains the content and its structure.
In the GettingStarted folder, create a plain text file
called example.html with the following text:
<!DOCTYPE HTML PUBLIC "-//W3C//DTD HTML 4.01//EN"
  "http://www.w3.org/TR/html4/strict.dtd">

<html>

<head>
  <title>Getting Started is the Hardest Part</title>
  <link rel="stylesheet" type="text/css" href="style.css">
</head>

<body>

  <div id="container">

    <h1>HTML and CSS example</h1>

    <p>Together, this HTML file and the CSS file show
    the modern approach to web design. Content and
    presentation have been separated. Div elements
    are used for layout. If you want to change this
    text you can edit this file (example.html). If
    you want to change how this file is presented
    you can edit the CSS file (style.css).</p>

    <!-- This is a comment that will be ignored -->

  </div>

</body>
</html>
The CSS file
In this example, the CSS file tells the browser how to present the HTML file with colours, fonts and font sizes.
In the GettingStarted folder, create a plain text file
called style.css with the following text:
body {
  font-family: verdana, arial, helvetica, sans-serif;
}

h1 {
  font-size: 180%;
  color: white;
}

/* This comment will be ignored. */

p {
  color: black;
}

#container {
  background: red;
}
Validate HTML & CSS
You do not have to do this step but it is a good way to find typos and to make sure you have structured the documents properly.
The w3c organization decides what is and what is not HTML and CSS. They have web pages where you can upload your files and check if they are valid HTML or CSS. The validator pages will check your files and report any errors or warnings.
Go to the HTML validation page.
Use the "Validate By File Upload" section. Click the "browse" (it may be
called "Choose File" depending on your browser) button to locate
example.html on your computer. Then click the "Check" button.
If you see green on the results page then your HTML page is ok. Red means
you have something to fix and the results page will even tell you which
line contains the error.
Go to the CSS validation page.
Use the "By File Upload" section. Click the "browse" button to locate
style.css on your computer. Then click the "Check" button.
If you see green on the results page then your CSS is ok.
View Your Page
Start your web browser.
Use the browsers menu (File>Open File...) to open the
example.html file on your computer. You should see
this red block with a white heading and black paragraph text:
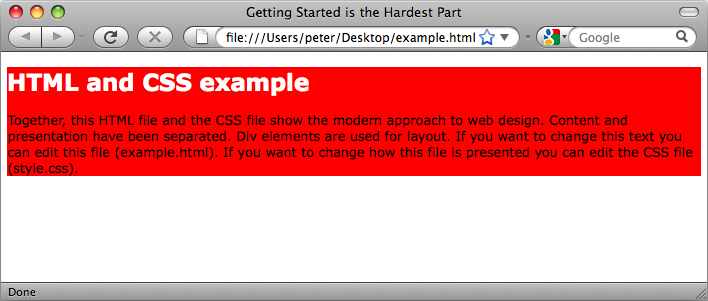
Congratulations! You just built a web page!!
Example Explained
This section explains the main ideas of the example and then what each line means.
Basic structure of the HTML
The basic structure of any HTML document is shown below. This is always the same but more things are added to it.
<html>

<head>

</head>

<body>

</body>

</html>
The head element starts with the <head> tag
and ends with the </head>
tag. The things that are in the head element are a bit like
programming. They are not the things that you want the person looking
at your website to see (except for the title of the web page.)
The body element starts with the <body> tag
and ends with the </body> tag. The things that
are in the body are the things like text and images that you want
the person looking at your website to see.
The head and body elements must be inside the <html>
and </html> tags.
Each line of the HTML
Now I will explain what each line does in example.html
<!DOCTYPE HTML PUBLIC "-//W3C//DTD HTML 4.01//EN"
  "http://www.w3.org/TR/html4/strict.dtd">
Tells the browser what type of document it is reading. In this case, the document is HTML Strict which is the most modern type. You can learn more about this line after you learn more basic HTML and CSS.
<html>The html element contains the head and body elements. The html
element starts with the <html> tag.
<head>Starts the head element.
<title>Getting Started is the Hardest Part</title>This is the title that appears at the very top of the window and when the user makes a bookmark for your great web page. You can change this and see what happens.
<link rel="stylesheet" type="text/css" href="style.css">Tells the browser to use the style.css file to decide
what colors, fonts, etc for the things that will be displayed in the browser
</head>Tells the browser we are at the end of the head element
<body>Starts the body element. You can change everything that is written in the body element. You can change the order of these things and see what happens. You can make more headings, paragraphs and comments and see what happens.
<div id="container">This starts a div element identified by "container".
A div element is a
layout section that you can control with the CSS file. In this example
the only thing that the CSS file does with this div is make the
background red. It will take a while for you to learn about how to use
div elements. You can remove
the <div id="container"> and </div>
tags and the red background will disappear.
<h1>HTML and CSS example</h1>A heading. h1 means Heading 1. Try adding some more
headings to this web page. You can also have sub headings called
h2, h3, h4...
<p>Together, this HTML file and the CSS file show the modern approach
to web design. Content and presentation have been separated. Div elements
are used for layout. If you want to change this text you can edit
this file (example.html). If you want to change how this file is presented
you can edit the CSS file (style.css).</p>
A paragraph. p means paragraph. Try adding some more paragraphs to this web page.
<!-- This is a comment that will be ignored -->A comment is anything between <!-- and -->.
The browser will ignore this and the person looking at the web page
will not see it (unless they know how to view the source of your web page.)
Comments are useful if you want to make a note to
yourself while you create the web page. Try adding some more comments
to this web page. You can put comments anyhwere in this file.
</div>The end of the div element.
</body>The end of the body element
</html>The end of the html element.
The CSS file
body {
  font-family: verdana, arial, helvetica, sans-serif;
}
Tells the browser to display all the text inside the
<body> </body> tags in
the Verdana font. If the computer that the browser is on does
not have Verdana then the browser will use Arial. If Arial is
not available the browser tries Helvetica. If none of these
are available the browser tries any sans-serif font.
h1 {
  font-size: 180%;
  color: white;
}
Tells the browser to display anything in <h1>
</h1> tags bigger and in white. Try adding this
line font-style: italic; inside the braces.
/* This comment will be ignored. */In a CSS file comments start with /* and end with */
p {
  color: black;
}
Tells the browser to make all paragraph text black. Try adding font-weight: bold;
#container {
  background: red;
}
Tells the browser to make the background red for the div
element called "container". Try adding border: 1px solid black;
Learn More
As you learn more about HTML and CSS you can keep returning to the
example above. The basic structure of the example will almost always be
the same. In example.html you can edit the text between the
<title></title> tags and between the
<body></body> tags. You can also edit
everything in the style.css file.
The web is full of tutorials on HTML and CSS. While reading web tutorials there are a few things to keep in mind:
- They might be old.
- They might use
<table></table>tags for layout. To follow the modern approach you probably will not be using<table></table>tags unless you are reporting something like a table of experimental data. - If the page is about XHTML then run away. XHTML was a still born technology that just didn't catch on enough to be useful.
Here are some links that will help you understand what happened in the example above. I recommend you start at the top of this list and work down.
- Bulletproof Web Design is a great CSS tutorial book. Perhaps the best technical tutorial book I've ever read.
- CSS: The Definitive Guide is the best CSS reference book.
- CSS Discuss mailing list
- Firebug plugin for Firefox
- http://www.w3schools.com/HTML/default.asp An HTML tutorial
- http://www.w3schools.com/css/default.asp A CSS tutorial.
- w3c page a bit like this page (html with css) This w3c tutorial creates a slightly more complicated example than what I have done above. It does show how a style sheet can be embedded in an HTML document. Using HTML and embeded stylesheets are not part of what is considered the modern approach to design as I've described above. However sometimes both are useful. This w3c tutorial might be good to read after reading the page you are looking at now. A good exercise would be to convert their example to HTML with a separate CSS file and then validate both files. At the bottom of the w3c tutorial there are some good css links.
- Sitepoint CSS reference
- A .pdf of free chapters from a site point book on CSS. This book does not get all good reviews on amazon.com but I thought these free chapters were great for a beginner. Use the first link and you do not need to give them an email address to get the chapters. One amazon review says they will spam your email heavily.
- Find more tutorials by doing Google searches "HTML tutorial" or "CSS tutorial"
Microsoft Windows FAQ
When I look at the HTML and CSS files in the desktop
folder I cannot see the .html and .css
file extensions. How do I make the file extensions visible?
Life is a lot better with file extensions turned on for all your files. It is better to see the whole name than have part of it hidden.
- Use the Start menu and select Start>Settings>Control Panel
- Double click the "Folder Options" icon
- Click the "View" tab
- Scroll down the list and uncheck the "Hide extensions for known file types" checkbox
- Click the "ok" button
Now you should see the file extensions on all your files everywhere.
What is a better text editor for HTML and CSS development on Windows?
There are many free and commercial editors available. You might like to try PSPad which is free.
Apple Macintosh FAQ
When I try to save a text file in TextEdit I can only
save it in .rtf format. How can I save in plain text format
with the .html or .css file extension?
Before you try to save the file in TextEdit you must set the file to plain text mode:
- In TextEdit choose the menu Format>Make Plain Text
- If you are asked if you want to convert document to plain text then click ok. After this step the formatting toolbar disappears in your document's window.
- Choose File>Save
- Type the file name you want with the
.htmlor.cssextension in the name - Make sure the "hide file extension" checkbox is not checked
- Click the "save" button
- You will be asked if you want to append the
.txtextension. Check the "Don't append" button
TextEdit is probably not the best text editor for web design.
When I open the .html file in the
TextEdit it is not plain text. What happened? How can I fix it?
TextEdit is displaying your .html file
like a web browser would. Sort of. To open the .html file
in plain text mode do this:
- Start TextEdit
- Choose the menu File>Open
- Select the file you want to open
- Check the "ignore rich text commands" checkbox
- Click the "Open" button.
Now you should see all of the HTML as plain text.
What is a better text editor for HTML and CSS development on Mac OS X?
There are good commercial editors like TextMate which I use frequently.
When I look at the HTML and CSS files in the desktop
folder I cannot see the .html and .css file
extensions. How do I make the file extensions visible?
Life is a lot better with file extensions turned on for all your files. It is better to see the whole name than have part of it hidden.
- On the Dock click the Finder button or click on the desktop to activate Finder
- In the menu bar at the top of the screen choose Finder>Preferences...
- Click the advanced icon
- Check the "show all file extensions" check box
- Close the preferences window
Now you should see the file extensions on all your files everywhere.
Comments
Have something to write? Comment on this article.